Hexo+Github搭建个人博客
简介
什么是 Hexo ?
Hexo 是一个快速、简洁且高效的博客框架。Hexo 使用 Markdown(或其他渲染引擎)解析文章,在几秒内,即可利用靓丽的主题生成静态网页。
什么是 GitHub Pages ?
GitHub Pages 是由 GitHub 官方提供的一种免费的静态站点托管服务,让我们可以在 GitHub 仓库里托管和发布自己的静态网站页面。
安装
安装准备
Hexo 基于 Node.js,搭建过程中还需要使用 npm(Node.js 已带) 和 git,因此先搭建本地操作环境,以 Linux 操作系统为例,安装 Node.js 和 Git。
安装 Node.js
从官网下载 Node.js 长期维护版安装包 , 例如:node-v16.14.2-linux-x64.tar.xz
新建~/software文件夹,解压 Node.js 安装包文件到~/software文件夹下
1 | $ mkdir ~/software |
- 解压文件的 bin 目录底下包含了 node、npm 等命令,我们可以使用 ln 命令来设置软连接:
1 | $ mv ~/software/node-v16.14.2-linux-x64 ~/software/nodejs |
- 查看 node.js 和 npm 软件版本,以检验是否安装成功。
1 | $ node -v |
安装 Git
- Linux (Deepin,Ubuntu, Debian):在系统终端命令安装 git 软件
1 | $ sudo apt-get install git |
- 查看 git 软件版本,以检验是否安装成功,在终端输入 git - -version 并回车,如下图出现程序版本号即可。
1 | $ git --version |
安装 Hexo
- 所有必备的应用程序安装完成后,即可使用 npm 安装 Hexo
1 | $ npm install -g hexo-cli |
- Hexo 安装完成以后,使用 ln 命令来设置软连接
1 | $ sudo ln -s /home/username/software/nodejs/bin/hexo /usr/local/bin/ |
- 查看 Hexo 软件版本,以检验是否安装成功。
1 | $ hexo -v |
升级 Hexo
官方强烈建议安装最新版本的 Hexo,以及推荐的 Node.js 版本。
1 | $ npm update -g hexo-cli # 升级 hexo 软件到最新版 |
软件兼容适配表
| Hexo 版本 | 最低兼容 Node.js 版本 |
|---|---|
| 6.0+ | 12.13.0 |
| 5.0+ | 10.13.0 |
| 4.1 - 4.2 | 8.10 |
| 4.0 | 8.6 |
| 3.3 - 3.9 | 6.9 |
| 3.2 - 3.3 | 0.12 |
| 3.0 - 3.1 | 0.10 or iojs |
| 0.0.1 - 2.8 | 0.10 |
建站
创建博客目录
在家目录创建个人博客文件夹 blog_folder
1 | mkdir ~/blog_folder |
生成网页文件
1 | $ cd ~ |
浏览本地站点
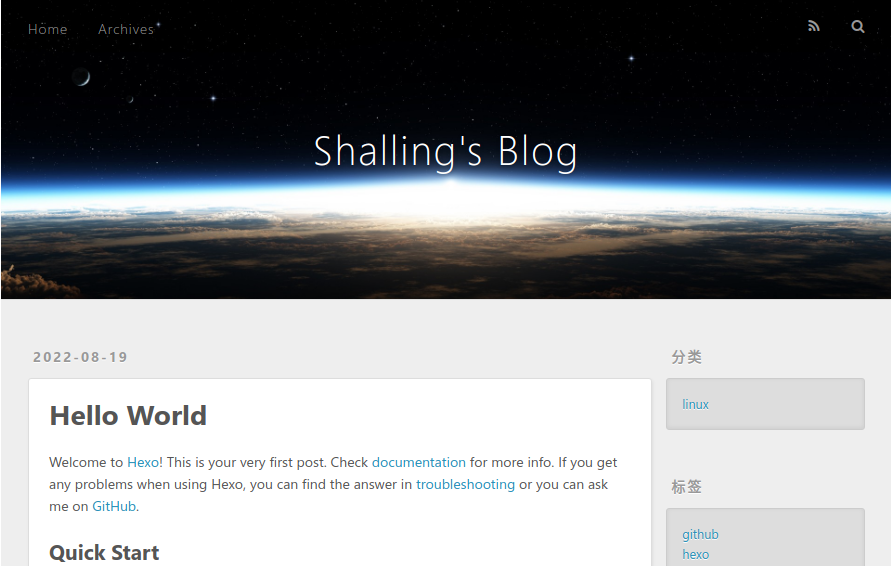
使用浏览器访问 http://localhost:4000 ,出现 Hexo 默认页面,代表本地博客安装成功了
注意:如果出现页面加载不出来,可能是默认端口被占用了,
终端执行快捷键 Ctrl+C 关闭服务器,重新运行 hexo server -p 6000 更改端口号,
重新使用浏览器访问 http://localhost:6000 ,查看是否出现 Hexo 默认页面。
部署
注册 Github 帐号
进入 github 的官网:https://github.com/ 在主页“Email Address”处输入自己的邮箱,然后点击“Sign up for Github ” 按钮,输入将来登录Github的密码,注册属于自己的帐号。
注意:
1、用户名:起名字要慎重,建议用有自己特色、简单易记不重复的,它将决定你博客的网络地址、仓库名称等。
2、电子邮箱地址:不要乱填,填写你真实的常用邮箱,注册时Github是要发激活链接到你邮箱的。
3、用户密码:不少于8个字符( 包括数字和字母),输入完会有一个人机验证,你只需把图片矫正即可。4、账户类型:选择个人免费版。
5、问卷调查:选择你感兴趣的信息。
6、验证邮箱:登录注册邮箱,完成帐号激活。
创建 Github Pages 仓库
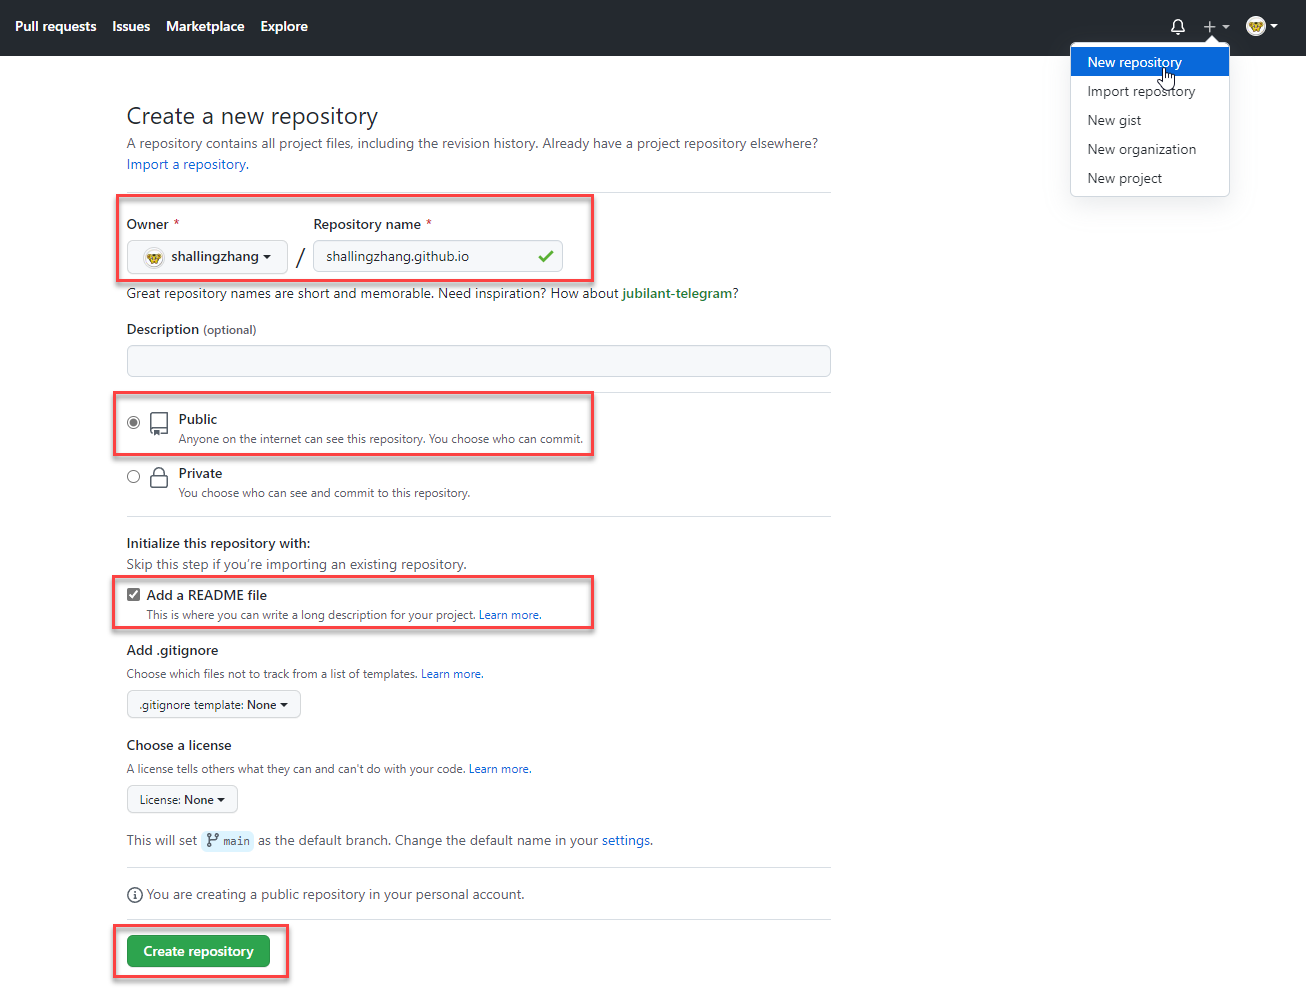
- 使用已经注册的帐号登录Github网站,然后点击页面右上角的加号–>New repository.
- Owner: “Github用户名”,Repository name:“Github用户名.github.io”
- 勾选 “Initialize this repository with” 下方的 “Add a README file” 选项。
- 填写以上内容后,点击 “Create repository ” 按钮创建仓库。

配置 Git 连接 Github Pages 远程仓库
- 在 Linux 操作系统下配置 Git 用户信息,打开命令终端窗口,输入如下命令:
1 | $ git config --global user.name "GitHub 用户名" |
- 安装ssh软件,创建ssh密钥:
1 | $ sudo apt install ssh # 安装软件 |
- 查看 ssh 密钥:id_rsa 为私钥,id_rsa.pub 为公钥.
1 | $ ls ~/.ssh |
- 打开 id_rsa.pub 文件,复制 ssh 公钥内容到剪贴板:
1 | $ vim ~/.ssh/id_rsa.pub |
- 添加 ssh 公钥到Github上:
- 登陆 GitHub 网站,点击页面右上角头像,从弹出菜单进入 Settings 页面。
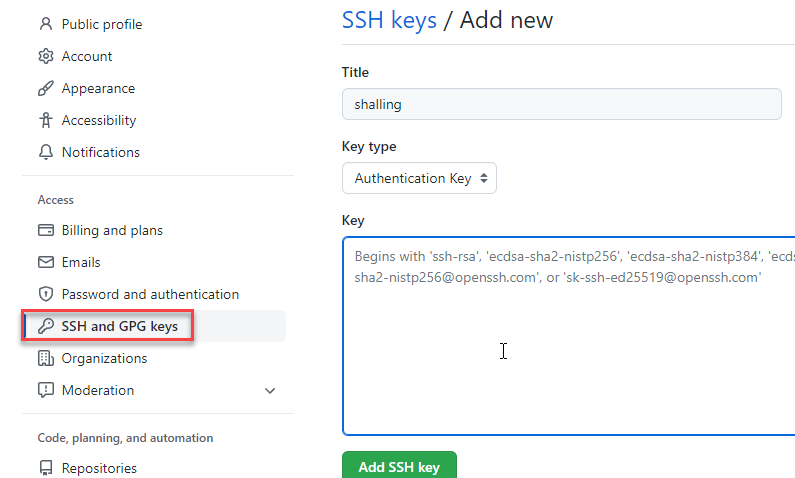
- 然后选择左边栏的 SSH and GPG keys,点击 New SSH key。
- Title 随便填写个英文名字,粘贴复制的 id_rsa.pub 内容到 Key 中。
- 最后点击 Add SSH key 按钮完成添加。

- 验证连接:打开终端,输入 ssh -T git@github.com 命令
1 | $ ssh -T git@github.com |
出现 “Are you sure you want to continue connecting ? ”,输入 yes 回车确认,
最后显示 “Hi username ! You’ve successfully authenticated……” 即连接成功。
- 配置个人令牌:
由于 github 在 2021 年 8 月 13日将原有的用户密码验证方式替换成了”personal access token”,因此我们这里需要将用户密码替换成”personal access token”,用于部署Hexo 到 GitHub Pages 时验证用户身份。
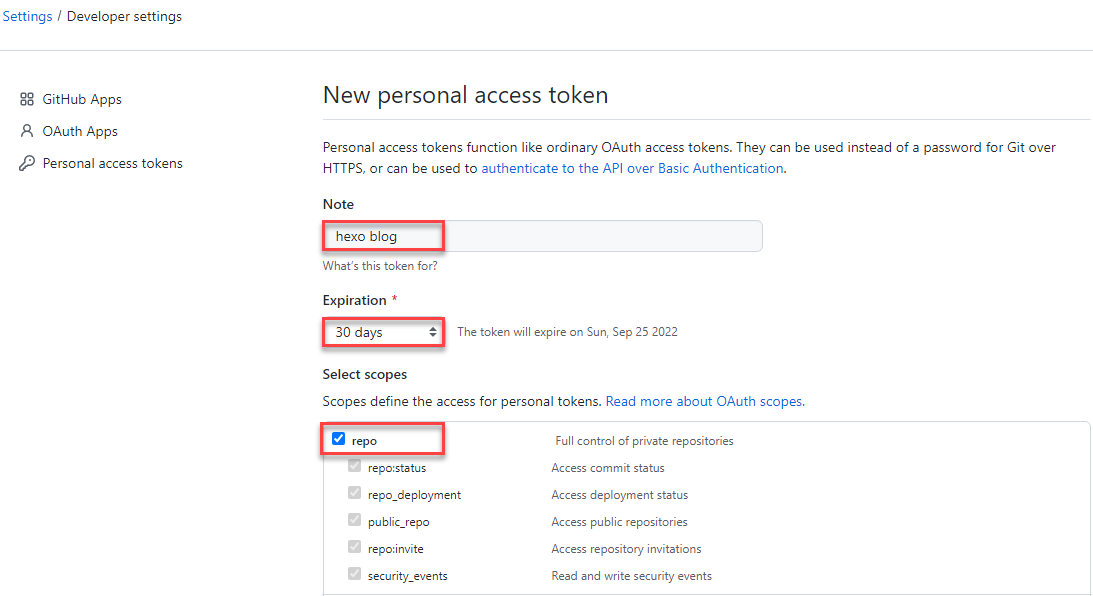
- 登录Github网站,进入“Settings–>Developer Settings–>Personal access tokens–>Generate new Token”
- 输入 Note:hexo blog,Expiration:30 days,Select Scopes:选择 repo 。
- 点击页面底部的 ”Generate Token“ 按钮,生成个人令牌。
- 复制个人令牌内容,保存成文档文件留存,供以后验证身份时使用。

- 如果您有令牌,则可以在通过 Https 执行 Git 操作时输入令牌,而不是密码。例如,在命令行中输入以下内容:拷贝一个 Git 仓库到本地。
1 | $ git clone https://github.com/username/repo.git |
部署Hexo 到 GitHub Pages
本地博客测试成功后,就是上传到 GitHub 进行部署,使其能够在网络上访问。
- 首先安装 hexo-deployer-git 插件程序:
1 | $ cd ~/blog_folder |
- 然后修改~/blog_folder/_config.yml 文件末尾的 Deployment 部分,修改成如下:
1 | deploy: |
- 运行 hexo deploy 将网站上传部署到 GitHub Pages。
1 | $ cd ~/blog_folder |
- 查看域名 https://用户名.github.io 如果可以看到 Hexo 网站,说明 GitHub 上的网页部署成功了。
